In a post-pandemic world, air quality monitoring is essential, be it in offices or in public spaces. Our solution will make sure that the flow of people, their actions and the quality of the air will be easy to follow on a dashboard.
This Air Quality solution, powered by Elsys, Parametric and WMW, is an ideal to measure people flow in your office or retail space and will greatly help your decision-making process.
This tutorial provides you with the key steps to complete to get started with this solution.
Before you start...
In order to complete this tutorial, you will need at least :
- The “Air Quality Monitoring Evaluation Kit” available on ThingPark Market. This kit contains the required hardware and software parts to implement the solution:
- 1 x Elsys ERS CO2 and its accessories
- 1 x Parametric PCR2 and its accessories
- 1x three-month access to the light version of WMW-HUB application.
- A ThingPark Community account with an active LoRaWAN™ gateway.
- If you don’t have a gateway, you can purchase one on ThingPark Market, ready to be activated on ThingPark Community.
Step 1: Connect ThingPark Community to WMW application
Let's start with WMW:
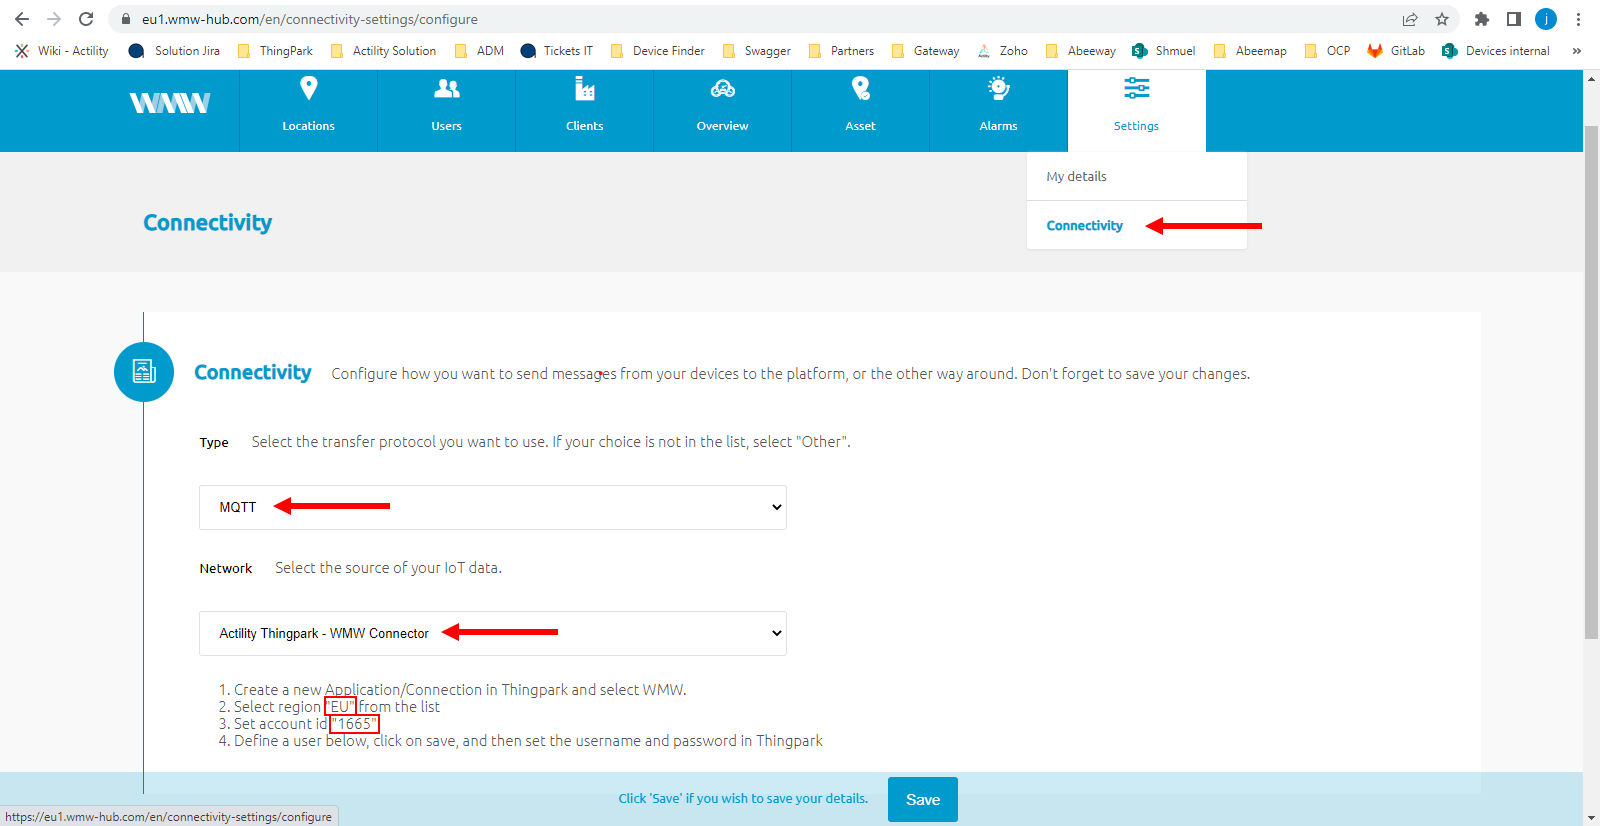
Connect to your WMW account on the URL https://eu1.wmw-hub.com/en/login. Once you are logged in, select "Connectivity" in the "Settings" tab, then MQTT as a type and Actility ThingPark as the network.
You'll find there the region and account id corresponding to your WMW account, keep it for later.
On the MQTT user line, click on the big green plus button on the left. It will give you two fields to set your MQTT login and MQTT password. You can choose whatever you want but be sure to keep it written for later.
Now that everything is set, you can click on the "Save" button.
Your ThingPark Community application are accessible through the following URL.
Once you log in, you should see a screen displaying the number of base stations and devices you’ve connected on this account as well as their status. No device or base station should be connected for now.
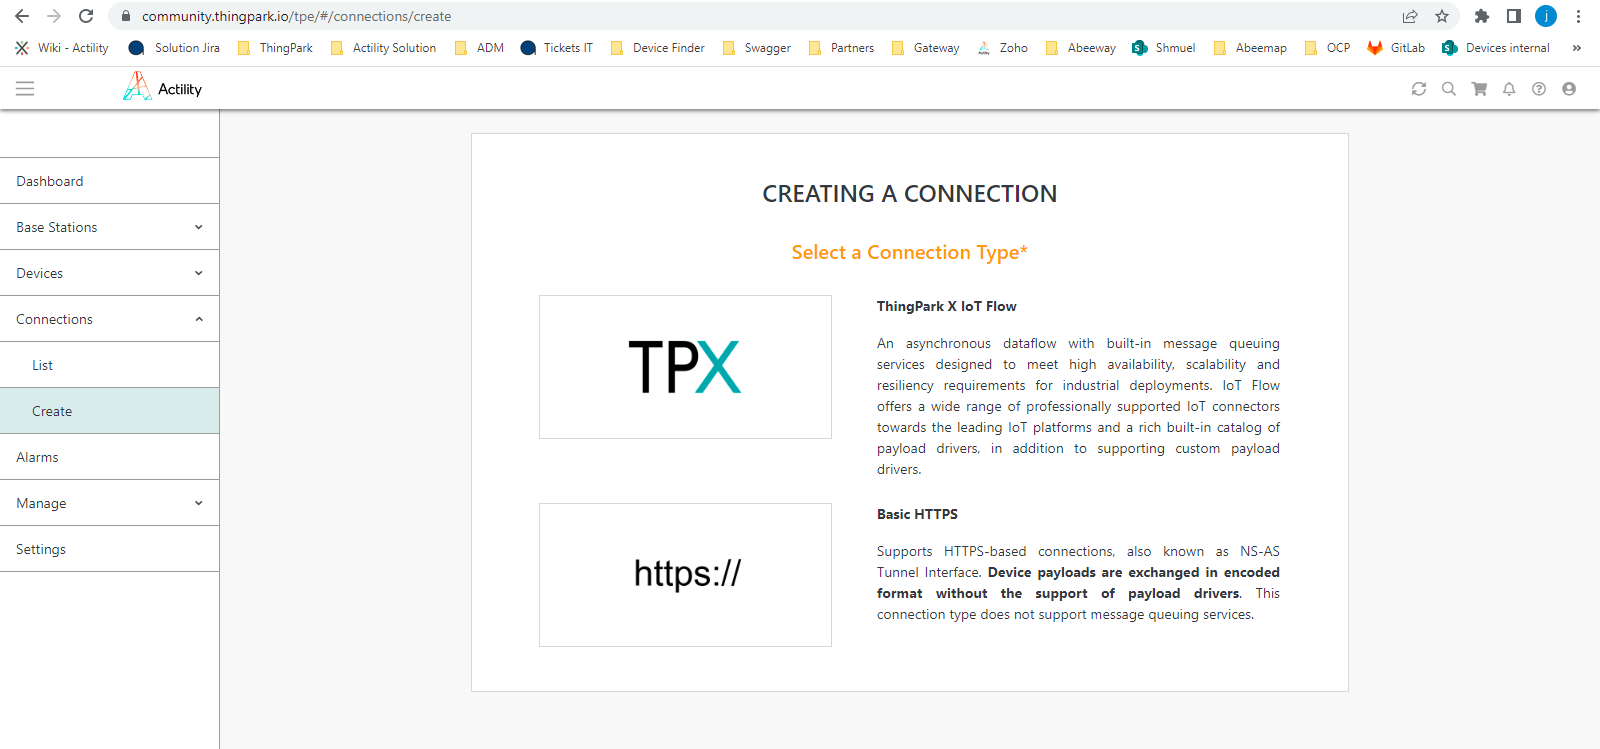
Select “Application > Create” on the list on the left to create your WMW application, it is mandatory in order to send the device’s messages to WMW; select the “TPX” option. It will load a page inside of which you'll find a WMW option. Select it.
A few fields are to be filled in order to complete this operation:
- Name: Name of your application displayed in ThingPark Community
- Region: you retrieved it on WMW
- Entreprise ID: this is the account ID you retrieved earlier
- Username & login: the MQTT username and logins you defined on WMW
Click on "Create" to finish the creation of this side of the connection and go in your list of application. The link between WMW and ThingPark is established !
Step 2: Activate your sensors on ThingPark Community
Elsys ERS CO2
Now that you have your application, you can add your device on ThingPark too.
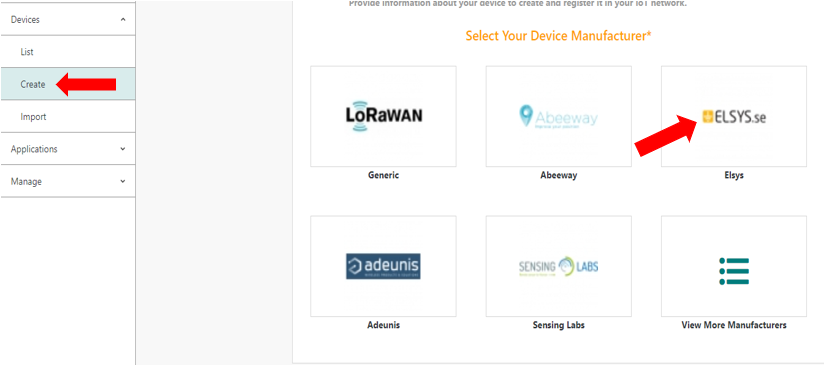
Go to “Device > Create” on the list on the left, if Elsys is in the list of the device manufacturers, select it, if it’s not, select “View more manufacturers”.
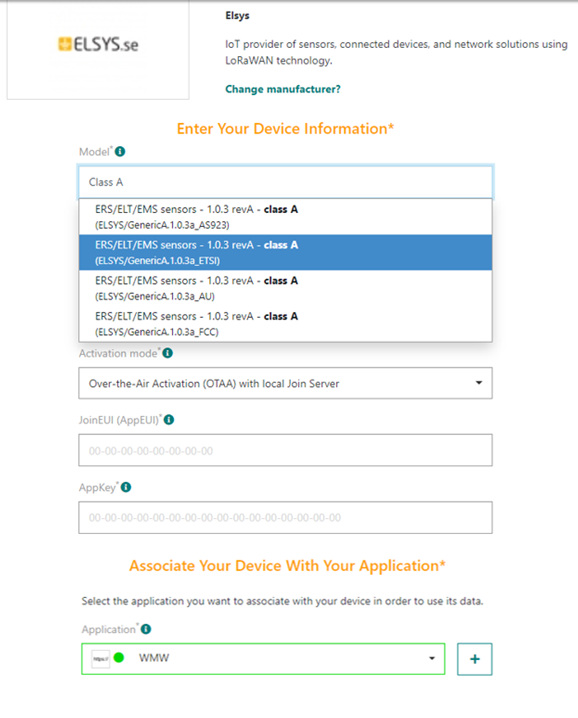
Once again, you will have to fill field to create your device:
- Model: Choose a Class A model that correspond to your region (AS923 correspond to Asia, AU is for Australia, ETSI is for Europe and FCC is for the United-States).
- Name: The name your device will have in ThingPark Community.
- DevEUI, AppEUI and AppKey: Codes you should have received with your device.
In the "Associate your device with your application" field, click on "Select your application", a drop-down list will appear. There, select the application you created for WMW; it should have a green dot showing that it’s working well.
Leave the mode to “No location” and click on “Save” finalize the operation.
Parametric PCR2-IN
Repeat the operation for the Parametric device. Pick the “Generic” option as its device manufacturer, and for its model, the PCR2 is a “LORAWAN 1.0.2 revB - class A”.
Step 3: Deploy your Elsys ERS CO2 sensor in the field
Elsys ERS CO2 Sensor Overview
ERS sensors are LoRaWAN™ room sensors for measuring indoor environment. ERS CO2 is enclosed in a room sensor box and it is designed to be wall mounted. Inside the ERS CO2 you will find five internal sensors: co2 sensor, temperature sensor, humidity sensor, light sensor, and a motion sensor (PIR). ERS CO2 is powered by two 3,6V AA lithium battery. The Battery life is estimated to be up to 10 years but depends on sample interval, transmit interval, data rate and environmental factors.
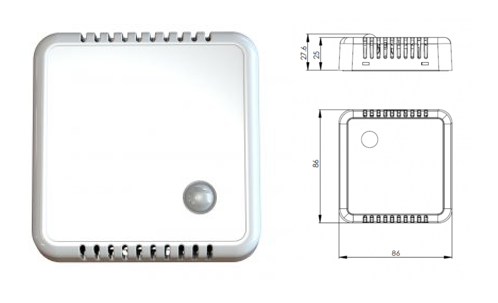
Elsys ERS CO2 Dimensions
Switch-on your device
To switch on your Elsys ERS CO2 sensor, you need to install the batteries, removing the 4 screws at the back. Once the batteries are plugged, the device will automatically start a Join Request to the network.
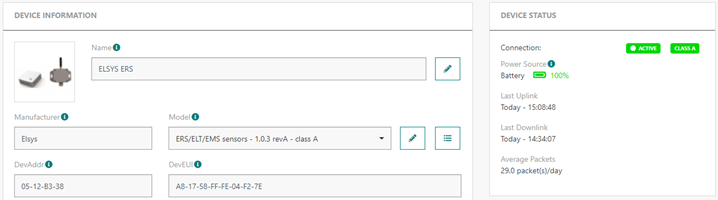
Once your device is active, you should be able to see it on ThingPark. In “DEVICE STATUS” there should be a green “ACTIVE” written in the top right.
Device default configuration
By default, the sensor will report all its properties every 5 minutes.
If you would like to change its default behavior, use the app “Sensor Settings” on an android phone to change the sensor configuration through NFC. Put your phone on the device, pick the parameters you want and click on write to confirm the new settings of your device.
More information can be found here.
Device physical installation
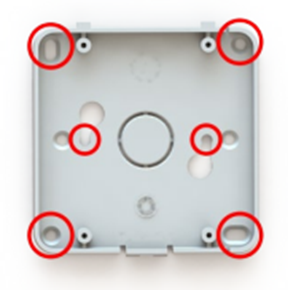
The Elsys ERS CO2 is equipped with 6 holes and can be mounter on any location ; more information can be found in the “Installation” section of the operating manual.
Additional resources
Battery life calculator
Elsys is providing a very nice calculator to estimate the battery lifetime of the device.
Based on the default configuration the estimated battery life is expected for 16 years for a device working at SF7.
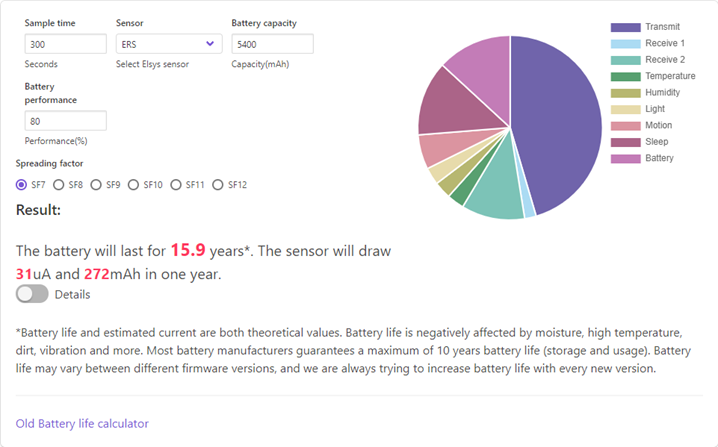
Battery Life Estimation using SF7
Step 4: Deploy your Parametric PCR2-IN sensor in the field
Parametric PCR2-IN Sensor Overview
PCR2 Indoor are camera-less peopleflow sensors for indoor use with LoRaWAN connectivity. The system includes powerful signal processing that enables directional measurement. Counters are transmitted in regular intervals over a public or private LoRaWAN network. It can be powered by a wide range of power supply from 12 VDC to a USB 5V.

Parametric PCR2-IN Dimensions
Switch-on your device
There are no batteries, but you need to open the device in order to set it up. Here is a quick start guide to start up your device. If you need more information, the user manual can be found here.
Device default configuration
By default, the PCR2 will have a measurement interval of 10 minutes and its uplink acknowledgement deactivated.
Device physical installation
The Parametric PCR2 has two holes on each side hidden behind flaps and can be mounted on either the walls or the ceiling; more information can be found in the “Installing the device” section of the quick start guide.
Step 5: Monitor the air quality with WMW application
Add your device on WMW
Using the credentials you received through email, you can access to WMW-Light on the following URL:
https://demo.wmw-hub.com/en/login
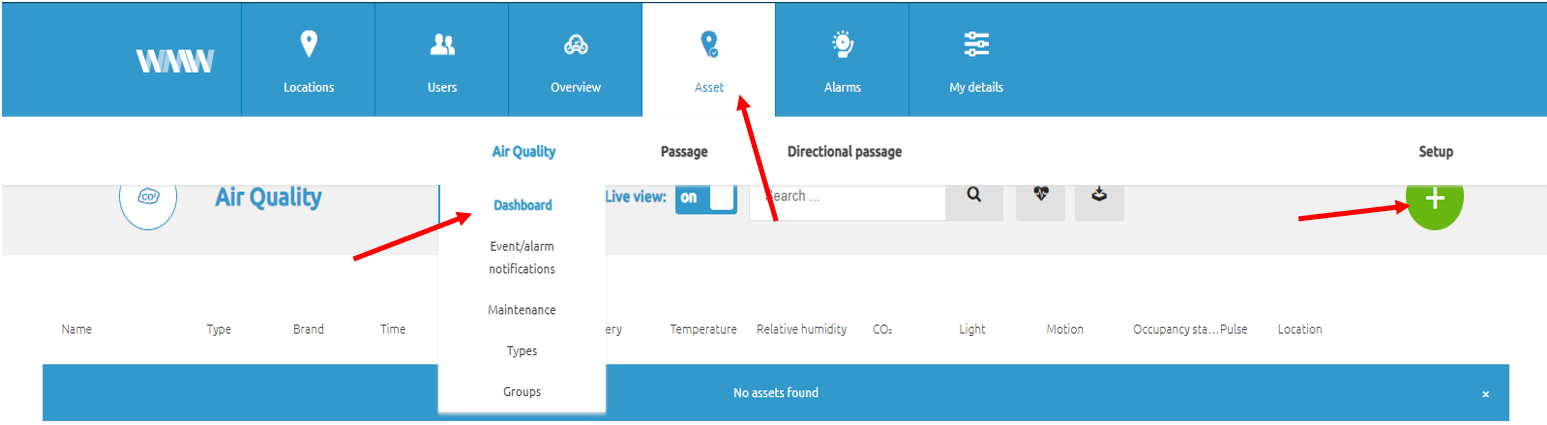
Since you already have provisioned your device on ThingPark Community, the main step that should be left will be to create the device on WMW. Click on “Asset” and then “Dashboard”, an empty page should appear since you have no device added yet. Click on the big green +.
Your Elsys ERS CO2 and Parametric PCR2 won't be on the same dashboard as they don't return the same type of information: you will have to select either “Air Quality” for the ERS CO2 or the “Directional Passage” for the PCR2 before “Dashboard”.
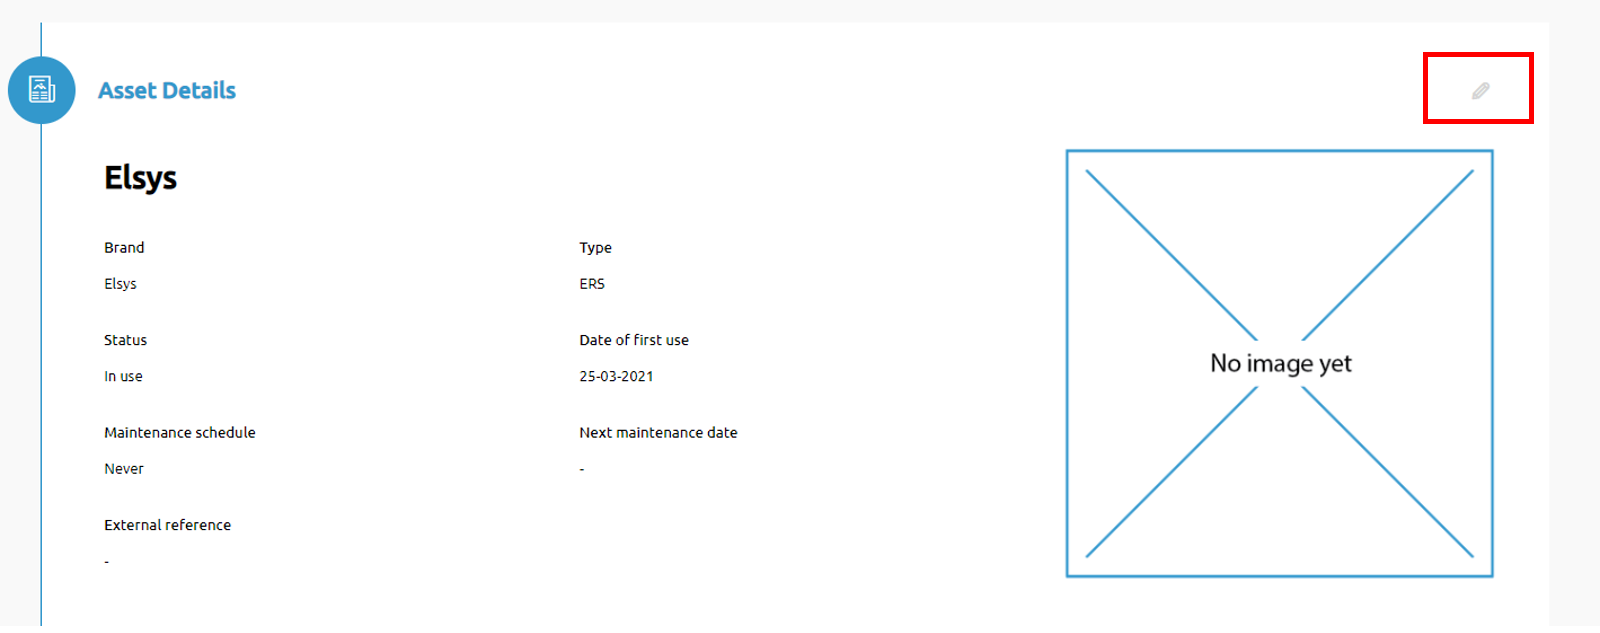
In order to fill your device creation fields, you need:
- A name that corresponds to your device: Elsys ERS CO2 or PCR2-IN
- Its Unique device identifier also called DevEUI
- Device type: Elsys ERS CO2 or PARAMETRIC PCR2
You must select or create an asset type in order to create your device:
- For the brand, pick the brand of your device: Elsys or Parametric
- For the type, enter the type of space you will monitor air quality in, such as meeting room, or open space
- You can add a picture or a description of this type of asset
Once you are done, click on “Save” and your device should appear on the corresponding dashboard.
Add alarms to your device
You can pick its position manually since it does not return it by itself, and if everything goes well, the information of your device should appear as the payloads are transmitted.
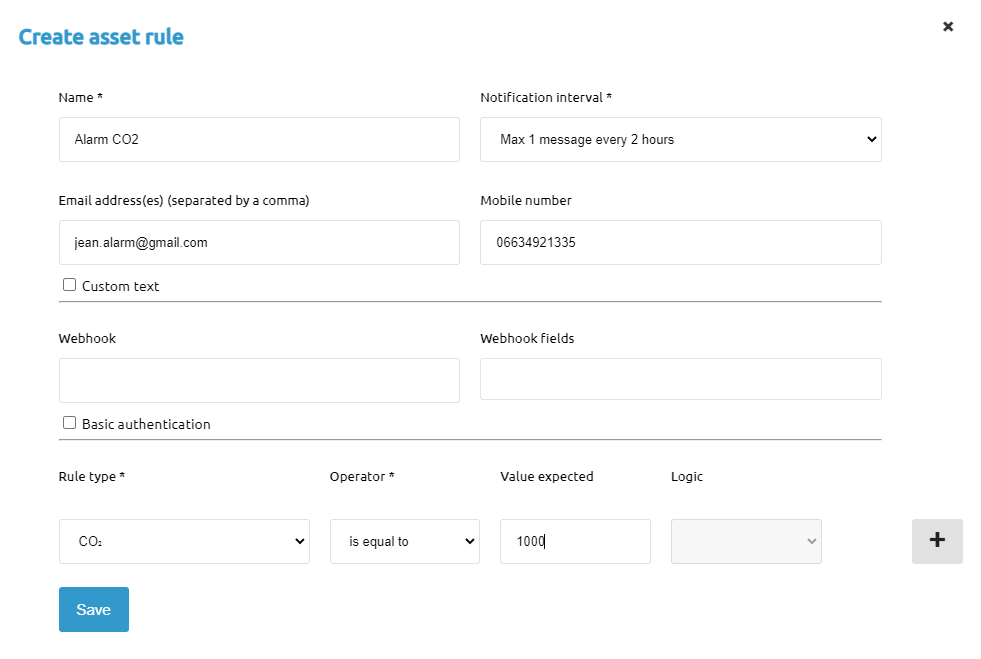
If you want to add alarms to your device, return on the dashboard page and click on the arrow next to the device. Click on the small pen to edit your device, scroll down to find the “Rule” section, and click on the big green +. There you can add and edit your alarms to send emails or create webhooks depending on the measures your device transmits.
For example, if you want to configure alarms for the CO2 threshholds in your office, select your ERS CO2 device and add a rule with mails to send the alert to, or phones or simply webhooks. You can find the CO2 thresholds here.
Monitor your device's information
You will find the information displayed by the tracker on the dashboard on the corresponding application.
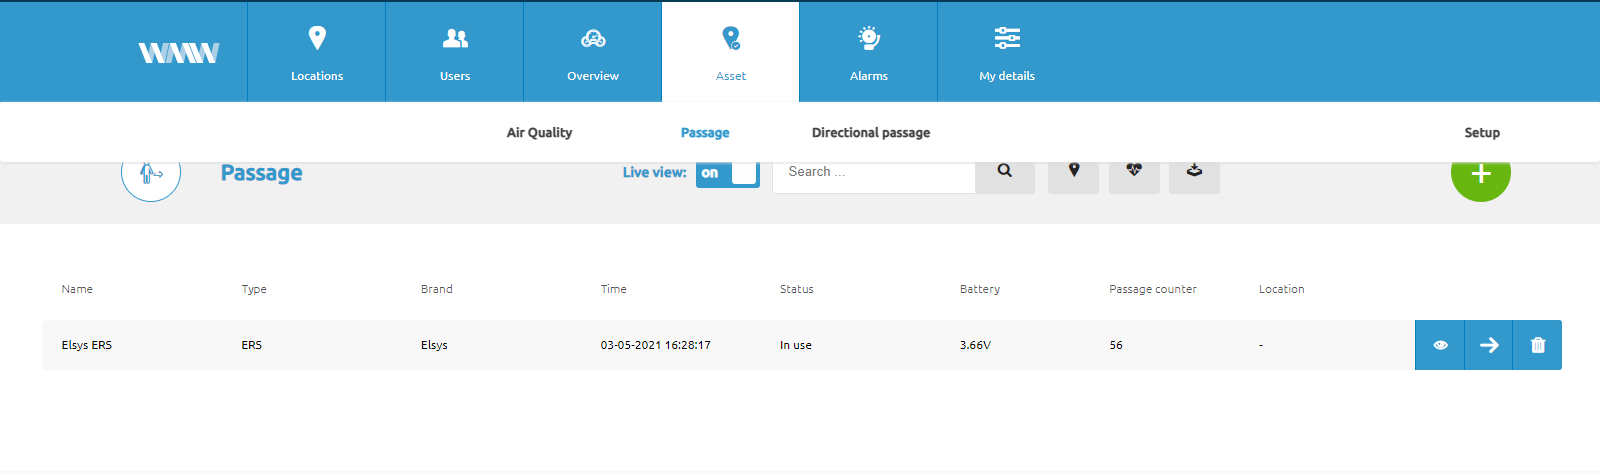
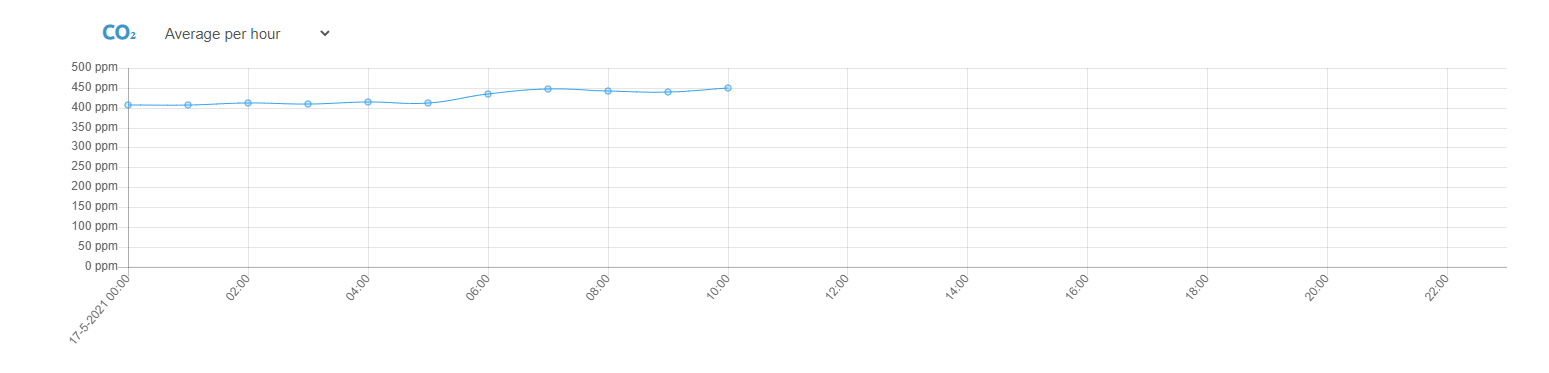
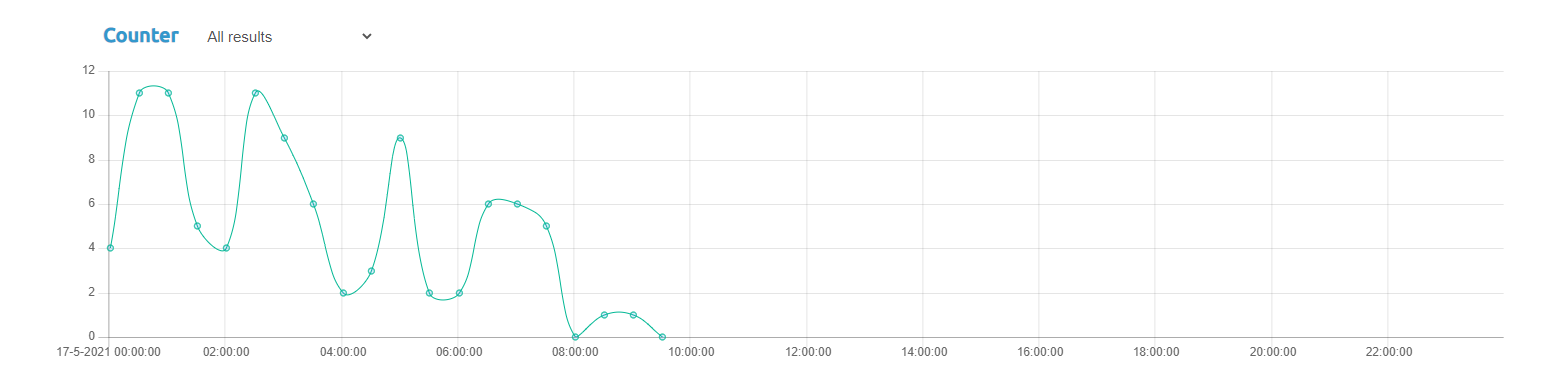
And if you want more extensive information, click on the arrow at the end of the line of the device, you will find the CO2 graph of course in "Air Quality" but also graphs of the temperature and humidity, occupancy, light, motion and passage counter are available. In “Direction passage”, you will get the "counter" graph which calculates the number of persons in the room, the passage direction and the temperature.