
In this article, we going to have very simple steps to use TPCP with almost no prior LoRaWAN® knowledge required. Goal of these steps is to send Sensor Data via a Gateway to TPCP and display the collected data
Activities will be,
- Registration to TPCP
- To be able to access Thing Park Platform
- Registration of a Base Station (a.k.a Gateway)
- To introduce the new Base Station to Think Park Platform
- WiFi Configuration of Base Station
- To enable Base Station to internet via existing WiFi network
- Monitor and get familiar of the Base Station
- To be able to monitor status of the Base Station and change parameters
- Registration of backend Application
- To be able to send collected Data for Backend processing
- Registration of a Device
- To introduce new Device to Think Park Platform
- Monitor and get familiar of the Device
- To be able to monitor the status of the Device and data which is Transmitted to Base Station
- Monitor and get familiar of the Application
- To be able to monitor the connection status of the backend application and transmitted data
- Use web hook technique to monitor the collected Device data
- To process collected Device data
Requirements for this activity:
for this activity, we going to need:
– a Base Station (a.k.a Gateway): GEMTEK MINIHUB V1.5 (https://market.thingpark.com/gemtek-minihub-v1-5-wifi-indoor-lorawan-gateway.html). This is a low cost, indoor Base Station and most importantly, no configuration required except WiFi definitions of the device. Which makes perfect selection for beginner scenarios in contrast to other gateways, which requires configuration at Registration step at ThingPark Admin Console.
Please notice that to get correctly configured device, you have to make 2 selections accurately:
– correct frequency for your country at RF Region Section
– you need to select “ThingPark Community” at LoRaWAN® Gateway preconfigured for section.
These configuration selections are shown below:
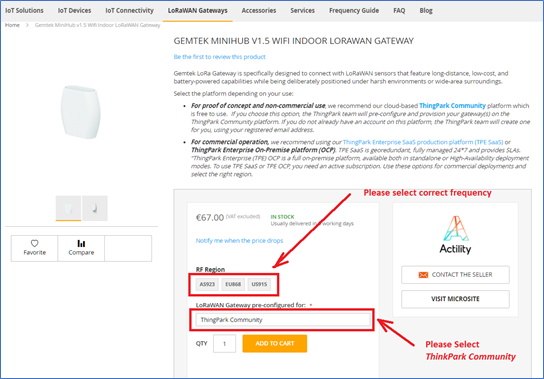
Figure: Base Station configuration selections
– a Sensor Device: Tinovi LORAWAN IO MODULE (https://market.thingpark.com/lorawan-io-module-with-built-in-pulse-counter-and-optional-soil-moisture-sensor-air-temperature-humidity-pressure-light-lux-12v-reversable-pulse-switch-output.html) which is cost effective and very simple to use. Furthermore, no configuration needed on the device except inserting battery. But you need to ensure that, frequency of this device (868Mhz) match with your Base Station. In addition, low sleep current consumption will make this device ideal for battery operated environments.
– an Active WiFi Network: GEMTEK MiniHub uses existing WiFi network to deliver the received LoRaWAN® packages to ThinkPark Community Network.
– a Battery: 18650 3.7V battery: because of the safety measures, sensor device is not shipped with battery, so you need to have an 18650 battery. Even capacity of the battery not important, 2.000mA battery capacity would be good choice which gives at least 2 weeks of operation.
Required Technical Knowledge:
– very basic technical knowledge (ie. WiFi definitions, simple configuration experience etc) needed
– no hardware knowledge needed
Solution Overview:
The solution that we going to setup will use LORAWAN Technology to collect data and send to a backend systems for further processing such as monitoring .. In this activity we going to monitor the temperature and humidity of the environment using a sensor device. The main Architecture of the LoRaWAN® environment shown below.
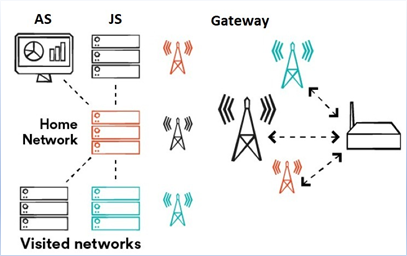
Figure: LoRaWAN® Network, generic Physical Architecture
Where, AS: Application Server, JS: Join Server
In this activity, we going to prepare a similar environment using existing WiFi Network. The target Architecture would be like the one shown below:
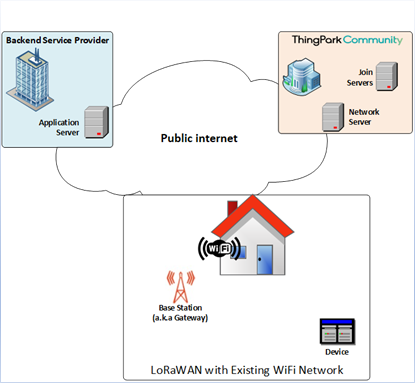
Figure: Target LoRaWAN® Network, Generic Physical Architecture