There are numerous sources of energy consumers in industrialized sites. These various sources can cause overconsumption, leading to significant energy expenditure. The main challenge for managers in sites such as factories, airports, ports, and hospitals is to identify where the largest items of expenditure are situated to optimize the equipment operation. To achieve this objectif and automate the process of monitoring data quality and integrity, the Energy Optimization solution kit is THE solution. It is easy to deploy and does not require the implementation of heavy on-site infrastructure to operate. The first step is to collect, qualify, analyse, and visualise energy consumers data to optimise your industrial energy expenditure.
This Energy Optimization solution, powered by Adeunis and Opinum, is an ideal to measure people flow in your workplace and will greatly help you understand and deal with your energy spending.
This tutorial provides you with the key steps to complete to get started with this solution.
Before you start...
In order to complete this tutorial, you will need at least :
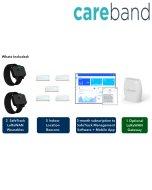
- The “Energy Management Kit” available on ThingPark Market. This kit contains the required hardware and software parts to implement the solution:
- 1 x Adeunis Pulse and its accessories
- 1 x Ufispace Enterprise Indoor Gateway
- 1 x access to the Opinum application.
- A ThingPark Community account with an active LoRaWAN™ gateway.
What will you learn?
Carrying out the steps of this quick start guide, you will learn:
- How to create a device and an application on ThingPark Community
- How to set up your device to send data to Opinum Data Hub from ThingPark Community
- How to create your account and invite other users
- How to setup your sites and sources
- How to start visualising meaningful information thanks to your dashboard, alerts, and reports
What do you need to get started?
Step 1 – Configurating your ThingPark account
Step 2 - Accessing Opinum Data Hub
Step 2 – Configuring your sites
Step 3 – Configuring your sources
Step 5 – Visualizing your data
Step 1: Configure your ThingPark account
Create an account
You can easily create a free ThingPark account to connect your devices to Opinum through ThingPark. Once it is done, log in: you should arrive on a page looking like the following.
You will need three elements for your ThingPark account to be functional: a gateway, an application to link to Opinum and a device.
Create your base station
- If you have a base station but you haven’t yet connected a base station to your account, you can follow this tutorial to set it up in three minutes.
- If your gateway is not ready to be activated on ThingPark, find your gateway in this list and follow its installation guide.
- Finally, if you don’t have a gateway, you can purchase one on ThingPark Market, ready to be activated on ThingPark Community.
Create your Opinum application
- Click on “Applications” > “Create” and then select the “View More Application Types” option, it should open a new page. Even if there is an "https://" option on the page, don't select it.
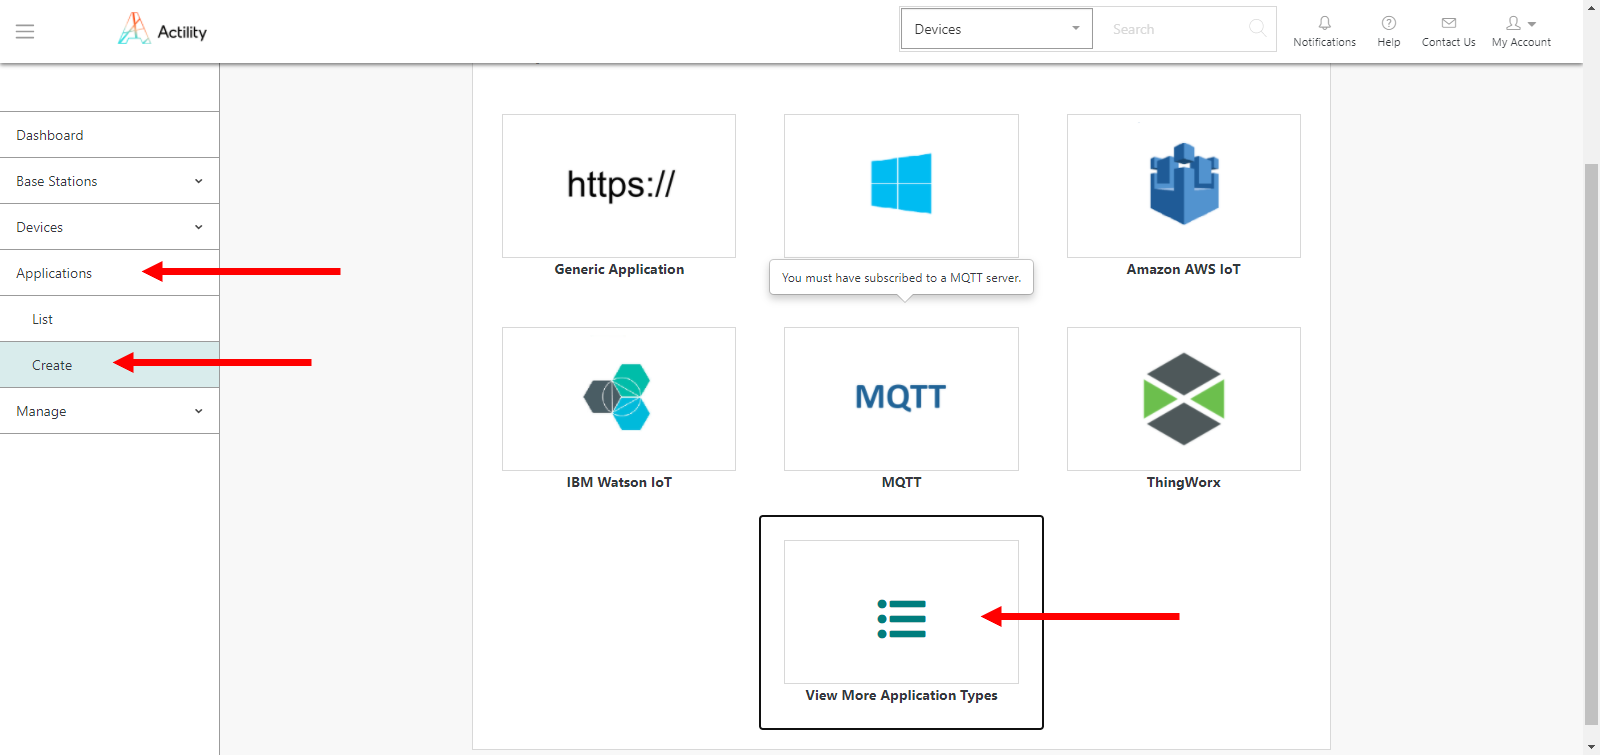
- Down the connector list, you will find the “HTTP” option, select it.
- Fill the fields with the corresponding information.
Name: Name of your application displayed in ThingPark Community
Destination URL: https://push.opinum.com/api/customFormat/65da7b44-2146-49d8-b5c6-9df21d367a4c
Headers: This field is divided between “Header Name” and “Value”. In “Header Name”, write “Authorization” and in “Value”, “Basic “ followed by “YourUsername:YourPassword” encoded in base 64 (here is a website where you can encode)
example: In the following screenshot, my username is “address@email.com” and my password is “ThisIsSecured”.
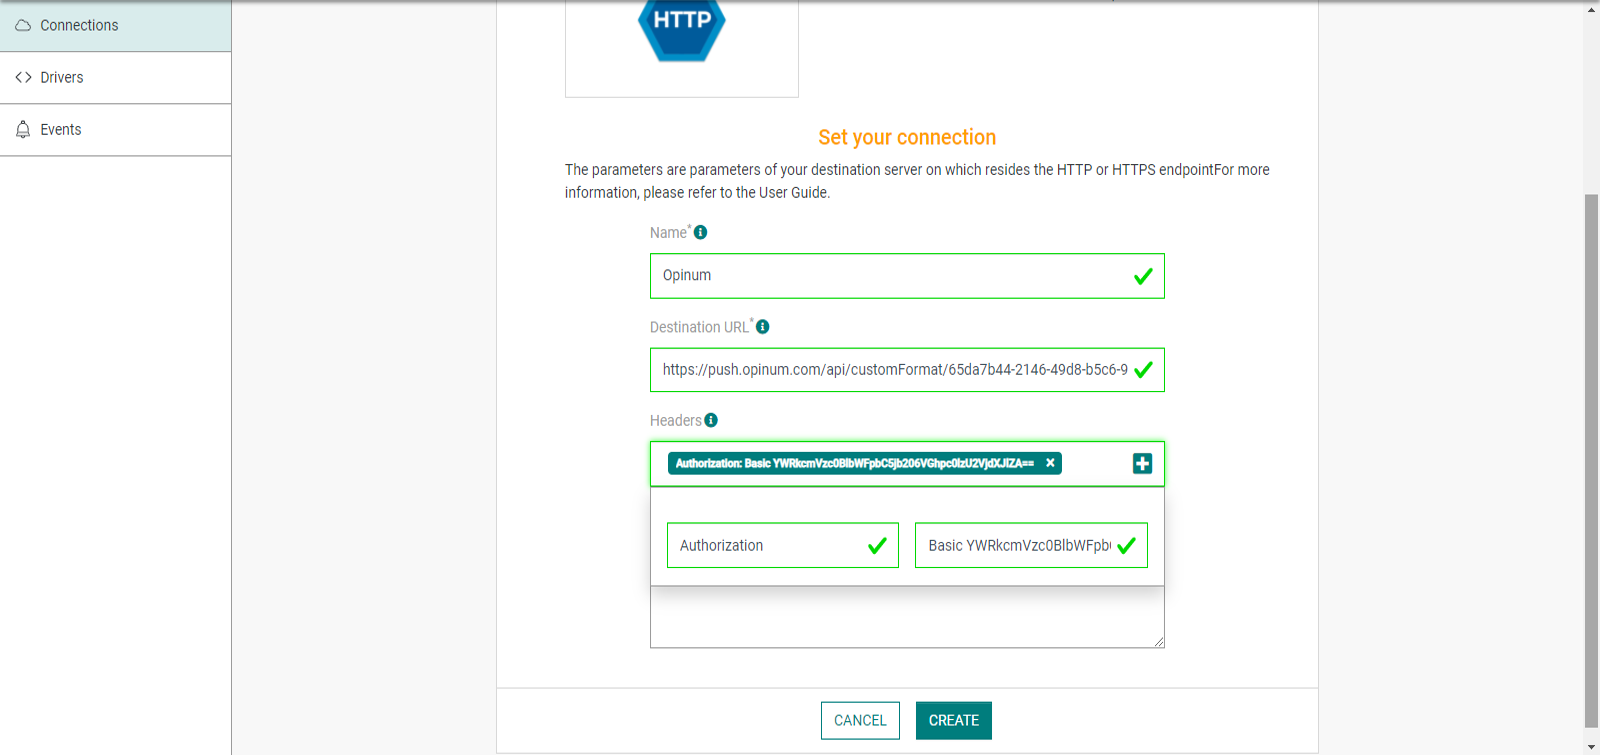
- Once you are done, click on “Create”.
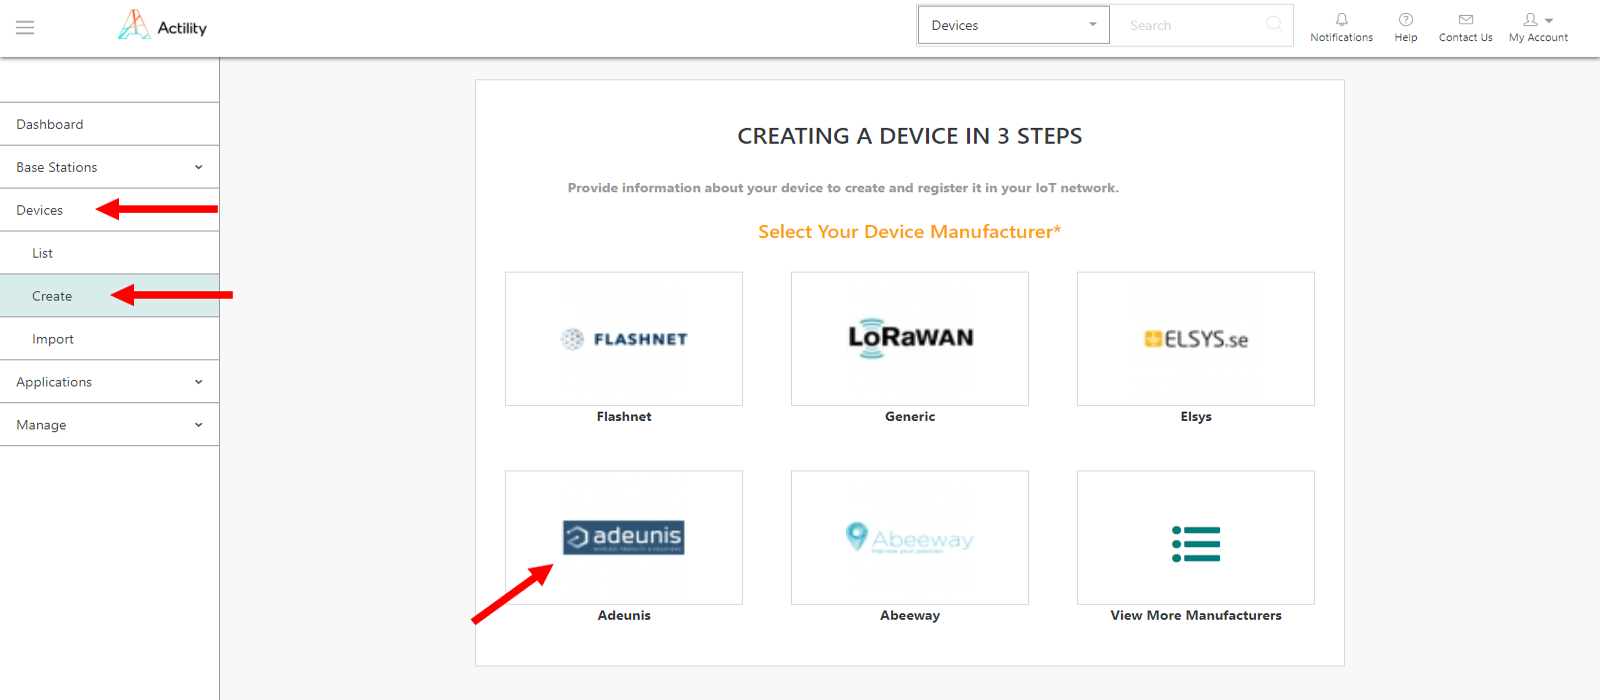
Create your device
- Go to “Device” > “Create” and select “Adeunis” as the device we will connect is an Adeunis Pulse. If Adeunis is not in the five first propositions, click on “View More Manufacturers”.
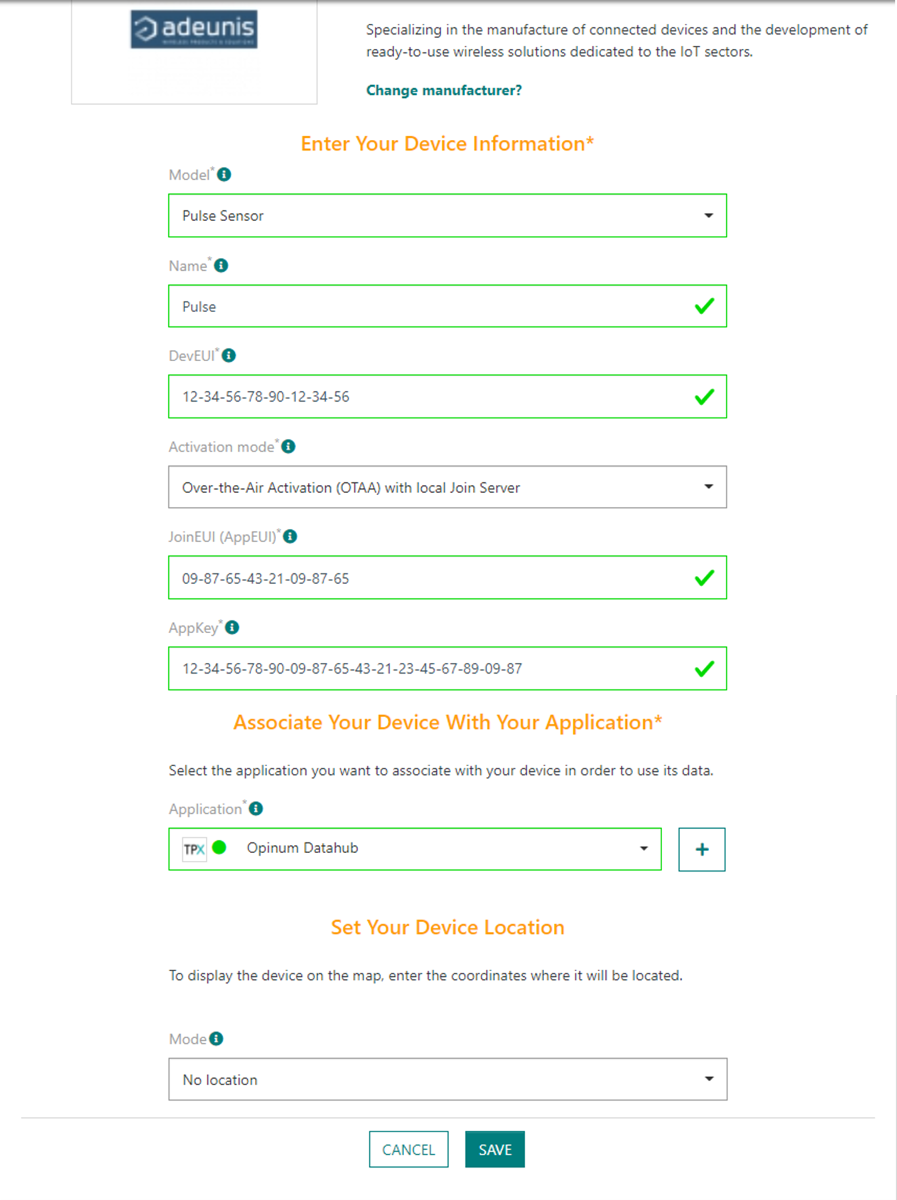
- There, you will have multiple fields to fill once again:
Model: ”Pulse Sensor”
Name: Name of your device displayed in ThingPark Community
DevEUI, JoinEUI and AppKey: All those information should be on a document you received with your device or should arrive through email.
Activation mode: “Over The Air-Action”
Application: Select the application you created earlier.
Mode: “No Location”. - Click on save to finish this operation. Your ThingPark account is ready and functional.
If you wish to connect any other type of device, it won’t be an issue on the ThingPark side, but you will have to contact Opinum to verify that your device’s payload is mapped on their side. If it is not mapped, just send them a payload of your device so they can map it.
Step 2: Accessing Opinum Data Hub
Creating an account
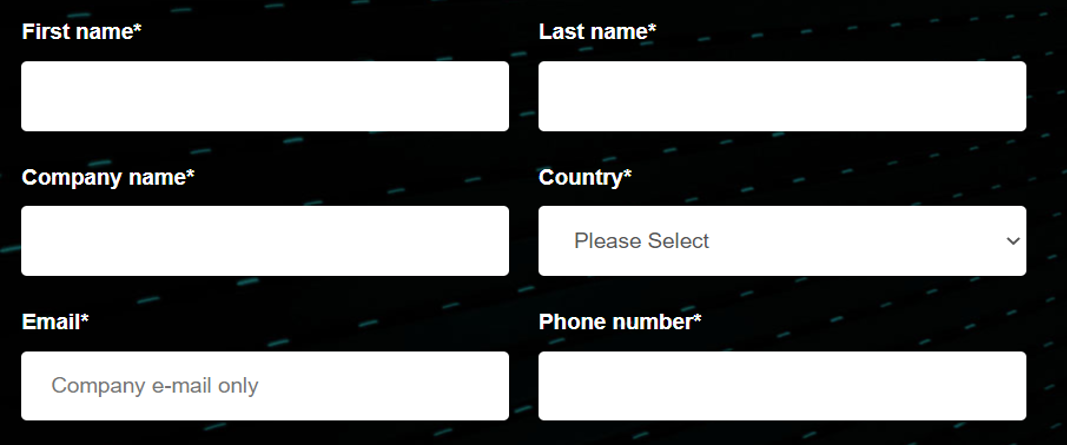
To start enjoying your free trial, you need to create your Opinum account.
- Go to opinum.com (https://pages.opinum.com/en/try-opinum-free-for-45-days) and fill the mandatory fields
- Click on the Submit button.
- You will receive a confirmation email. Click on the button in the email to open the account confirmation page. On this page, check your account information, edit them if needed and choose your password.
- Click on the Save button. Your account is created, you can now log in Opinum Data Hub.
Logging in Data Hub platform
- Fill the Username and Password fields.
- Click on the Login button
Navigating into Data Hub
You can browse Opinum Data Hub thanks to the navigation header.

Dashboard: visualization of data via personalized graphs
Sites: list of all your sites and tools to manage them
Sources: list of all sources and their status to Opinum Data Hub
Reports: export of data via reports (Excel or PDF) or towards other data visualization tools
Alerts: manage alerts and notifications on data
Storage: store data files
Inviting users
- To invite users, click on your name at the right of the header to open the Settings menu, and click on Invitations.
- The invitations page opens. Click on Invite someone and fill in the field to send an invitation to a (future) user of Opinum Data Hub.
Role: If the new users will have the role of users, the manager who invites them to have to grant them access to the features they need. By default, the user has no access to any functionality.
Secondary access: select secondary accesses if needed.- OPINUM DATA HUB: access to the Opinum Data Hub platform
- SITECARE: access to the SiteCare platform
- OPINUM INDEX: access to application Opinum Data Hub Index
Step 3: Configure your sites
Create your first site
- Click on the + in the menu displayed on every page and click on Add site. The pop-up of Sites creation appears.
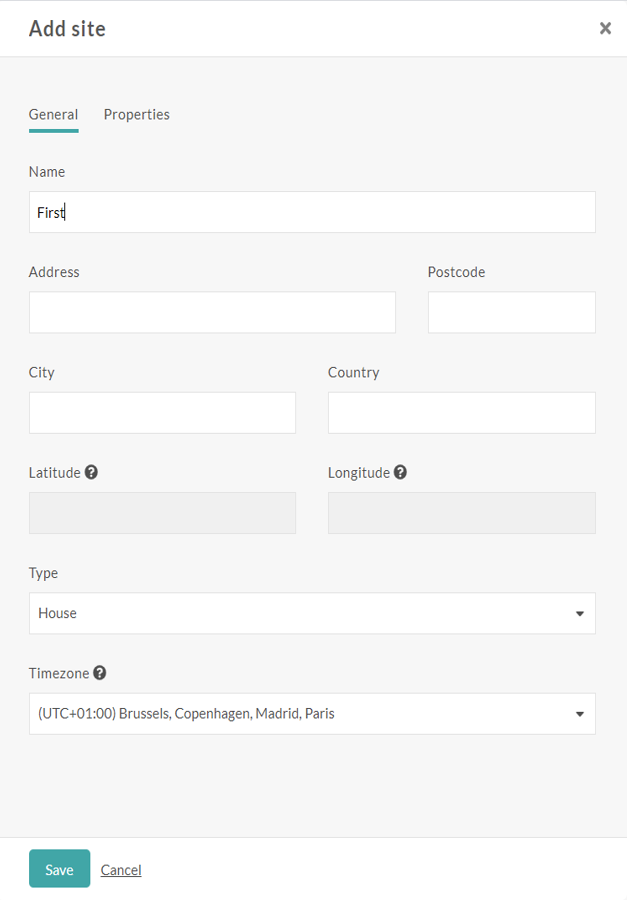
- Choose the site name. It does not have to be unique, as a unique ID will be given automatically at the creation of the site.
- Encode the address (optional). Opinum will generate geopoints based on the postal address and it will allow you to display your sites on maps, in the dashboards.
- Select the type and the time zone of your site.
- Click on the Save. Your new site will be immediately created, and you will find it in the Sites page.
Managing your site
All sites are listed in the Sites page. From this page you will be able to create, update and delete sites. but also find and add information related to your sites.
Step 4: Configure your sources
Create your first source
- Click on the + in the menu displayed on every page and click on Add source. The pop-up of Source creation appears.
- In the Site drop-down, select the Site related to your source and choose Custom sources before clicking on the Next button.
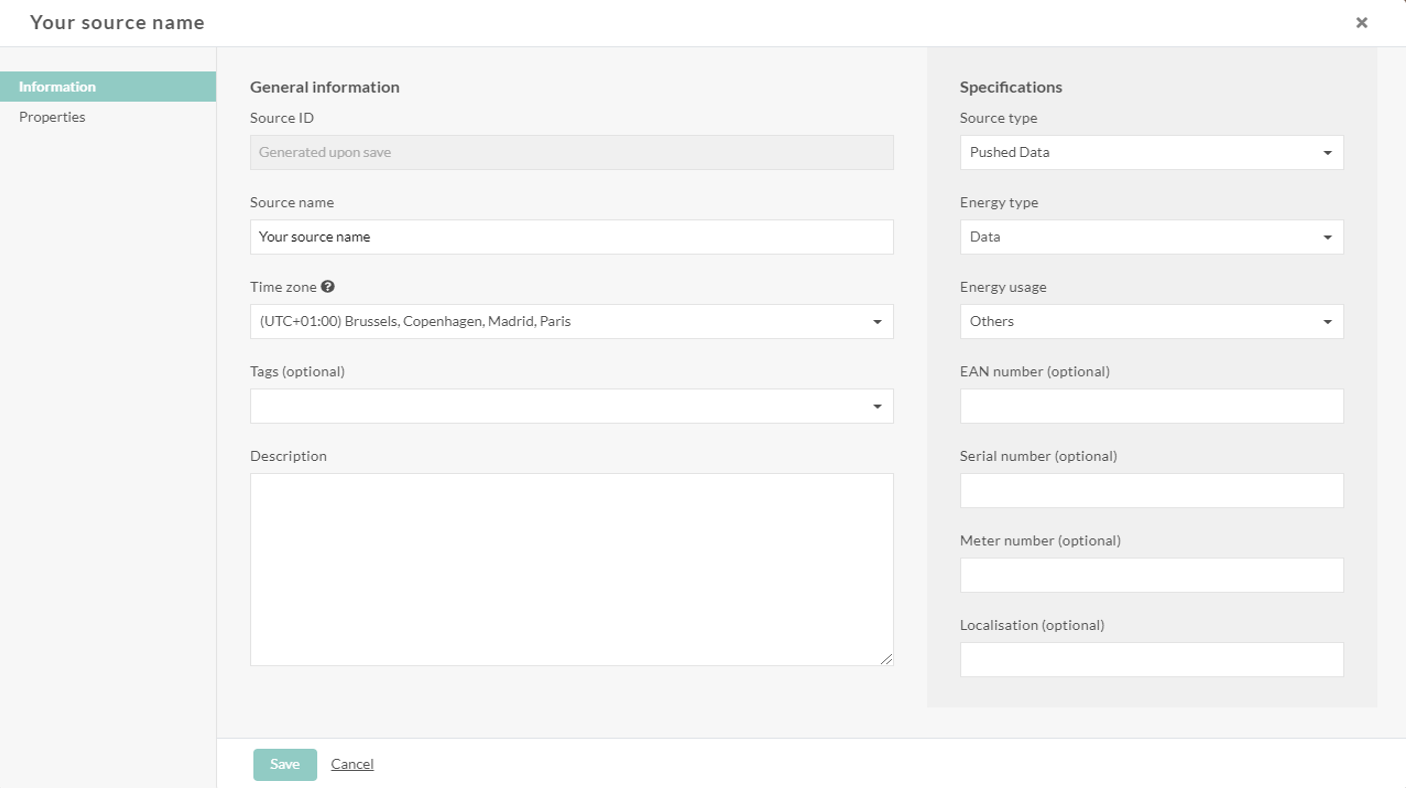
- Choose the source name. It does not have to be unique, as a unique ID will be given automatically at the creation of the source.
- Encode time zone in which the data of the source will be ingested. Choose your Energy type.
- Save the new source by clicking on the Save button.
Your new source will be immediately created, and you will find it in the Sources page.
Once your source is created you can always update it. Go on the Sources page and click on the ID or the name of your source. The Source information pop-up will appear, and you will be able to edit all the fields filled above.
Create variables
A variable is a time series that contains the data.
There are two types of variables in Opinum:
Raw variables: received via a third system (hardware or other source)
Virtual variables: or calculated variables, calculated via a combination of a specific variable of a specific source with other data sources available in Opinum.
- Go on the Sources page and click on the ID or the name of the source. The Source pop-up will open. Choose the tab Variables.
- Click on the button add a new variable and fill in the different fields.
- Click on Save.
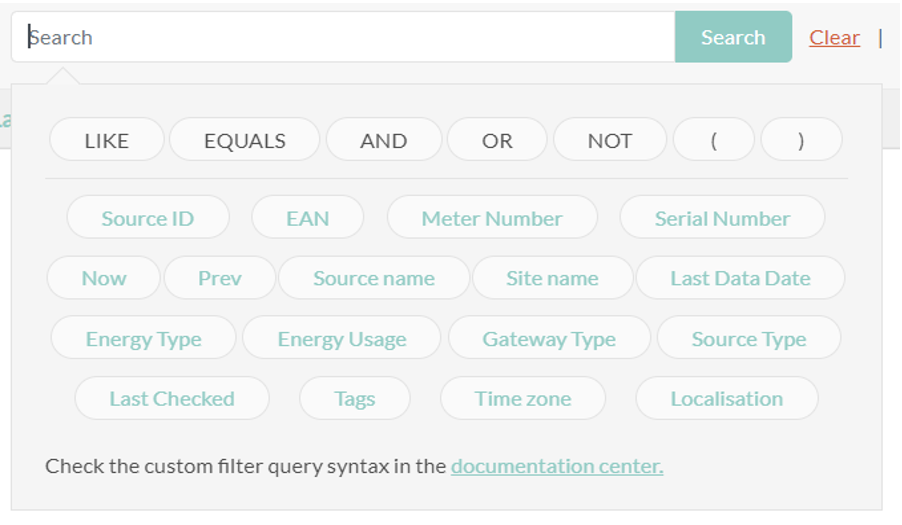
Manage your sources
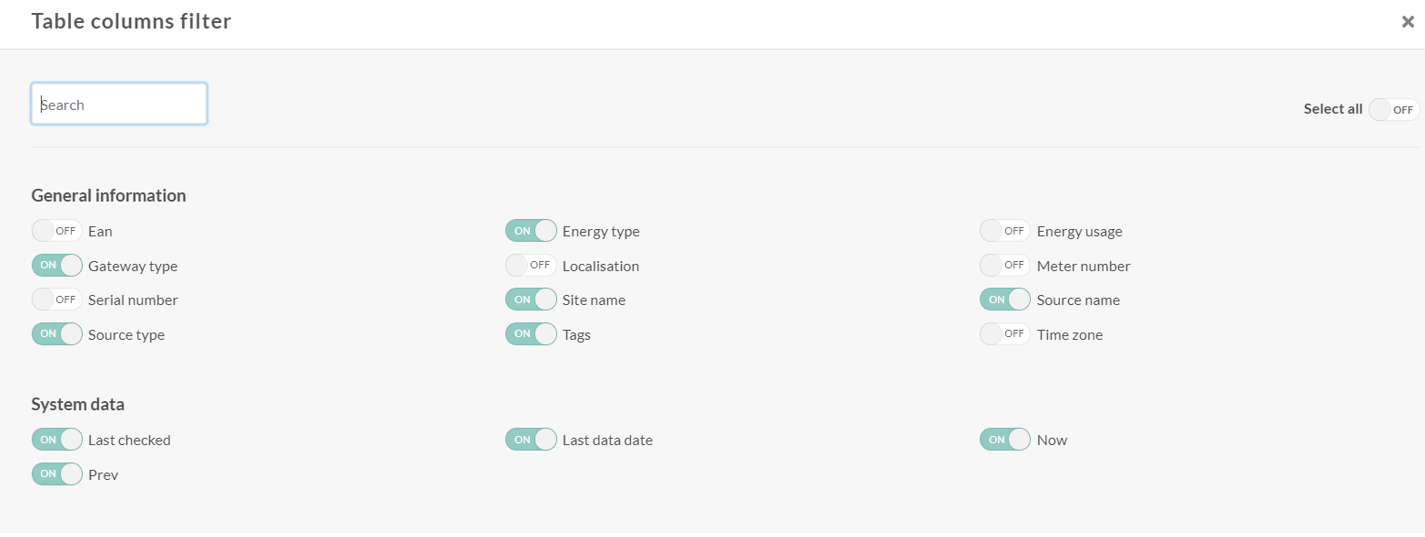
Sources are displayed and can be managed in the Sources page in Opinum Data Hub. You can customize the information displayed on this page and save it as views. A view is a set of sources saved as you sorted, filtered, and displayed them.
- To choose columns displayed, click on this picto:

- The Table columns filter pop-up opens, just select the columns you want to display.
- Data can be sorted with a click on the header of the column.
- Data can be filtered with a click on this picto, present on each column:

- At the top of the page, you can search sources with a custom filter query syntax.
Step 5: Vizualize your data
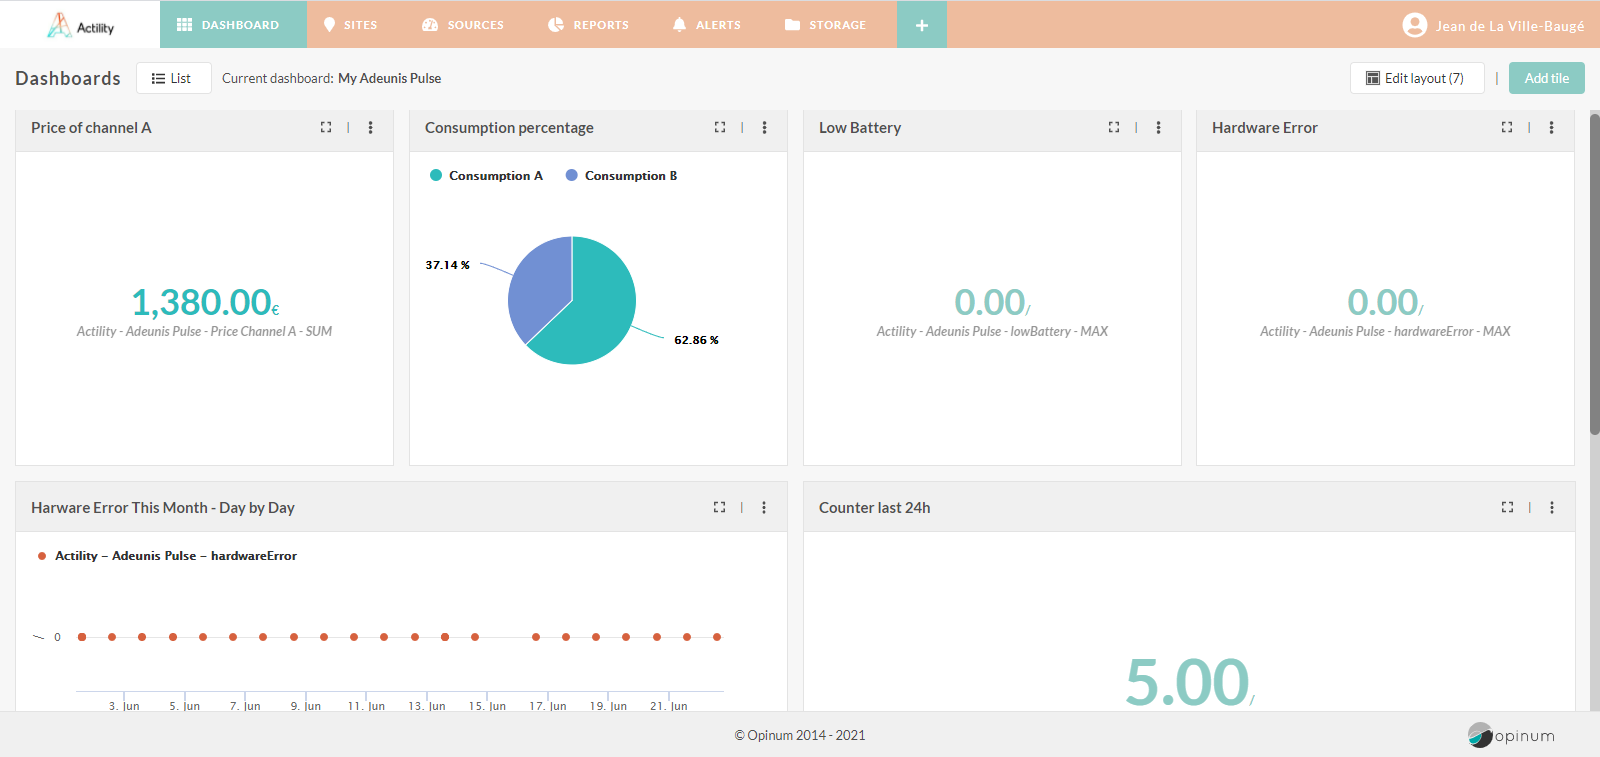
Create your dashboard
Each dashboard can be freely composed by different types of graphics available in Opinum Data Hub. You can choose to create a graphic based on the data uploaded in Opinum or based on external data.
- Create your first dashboard. Click on the + in the menu displayed on every page and click on Add dashboard. The pop-up of dashboard creation opens.
- Enter a name for your dashboard and click on the Save button.
- To add graphics, click on Add tile on the upper right of the dashboard tab. The tile pop-up will open.
- Choose a name, your visual source, visualization type, time frame and data sources you want to display on your tile.
- Click on the Save button and your new graph appears in the dashboard.
Setting up alerts
An Alert check your data to verify if the value is either above or below a specified threshold.
- To create your first alert, click the + button in the header of all Opinum Data Hub page and click on the Add alert The alert creation pop-up opens.
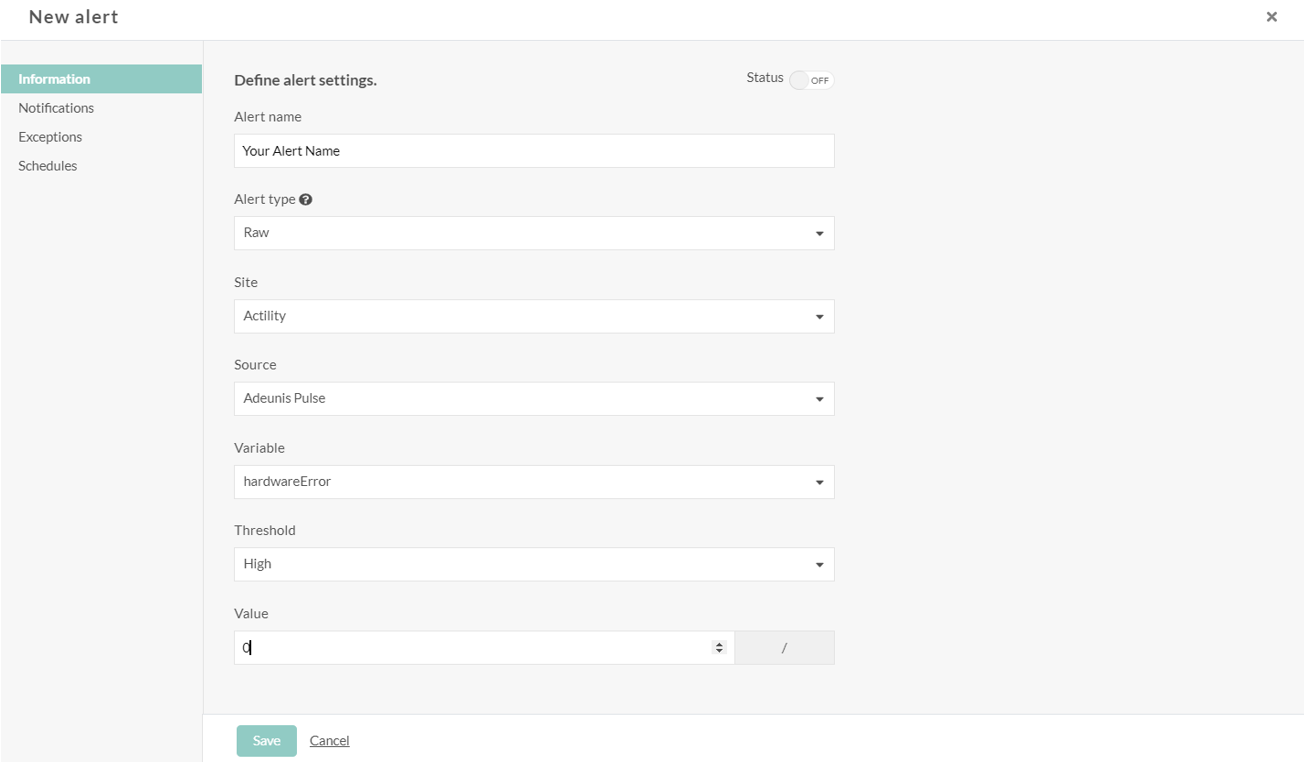
- Complete fields.
- Click on Notifications to add notifications.
- Click on the Save button
Form your reports
Reports enable users to export their data from Opinum. You will be able to create custom Excel and PDF reports, schedule when and how you want to receive them.
- Click on the + in the menu displayed on every page and click on Add report. The pop-up of dashboard creation opens.
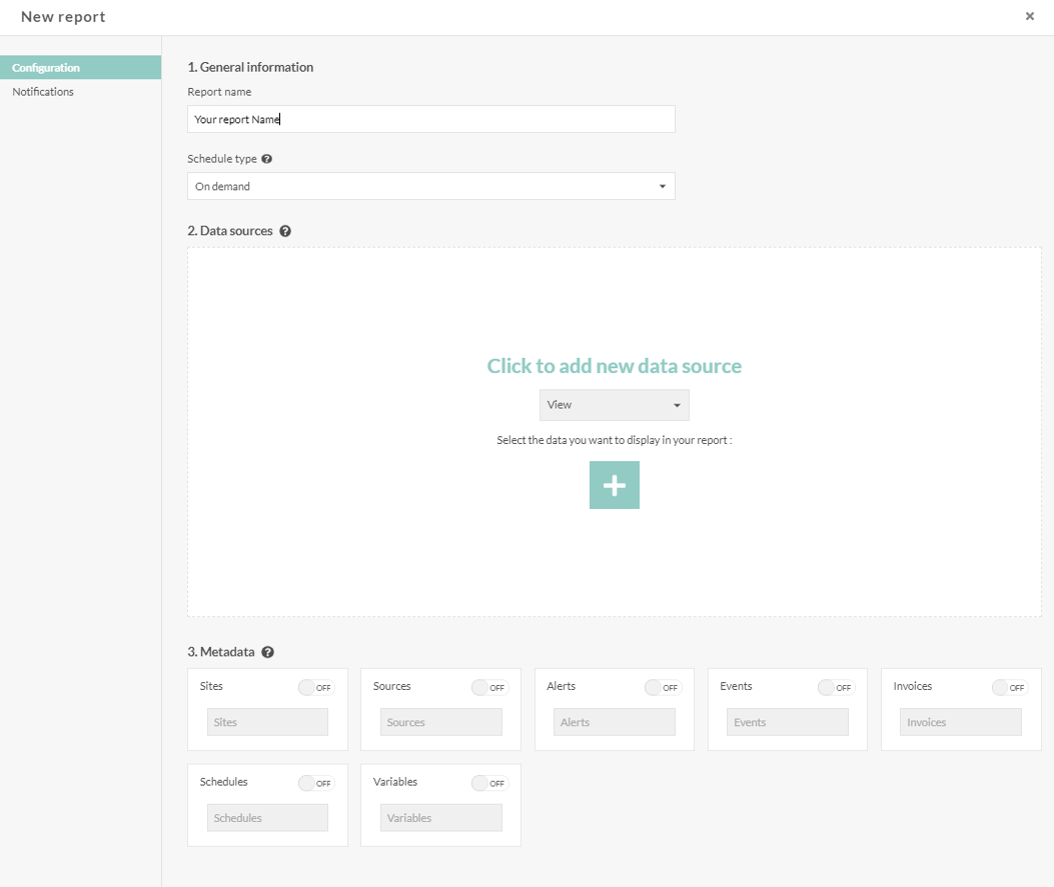
- You can now fill all the fields as follows.
Schedule: The report can be generated on demand each type you need it or generated on a scheduled base. To generate the report on-demand, select On-demand in the Schedule type field. To schedule the report, select Scheduled in the Schedule type field. Then choose the schedule.
Megadata: You can also add metadata linked to the sites and sources selected in the previous step. All these options are optional.
Notifications: Here, you can configure the report recipients. Choose who will receive the report and how by clicking on the Add another notification link. - Click on the Save button to create your report. You will now find it in the reports page.